- 1、动画概述
- 2、动画分类
- 3、页面内动画
- 3.1、布局更新动画
- 4、组件内转场动画
- 4.1、if/else产生组件内转场动画
- 4.2、ForEach产生组件内转场动画
- 5、页面间的动画
- 5.1、共享元素转场动画
- 5.2、页面转场动画
- 6、网络
- 6.1、基于web组件构建网络应用
1、动画概述
在ArkUI中,产生动画的方式是改变组件属性值并且指定相关的动画参数。当属性值发生变化后,按照动画参数,从原来的状态过渡到新的状态,就形成一个动画。
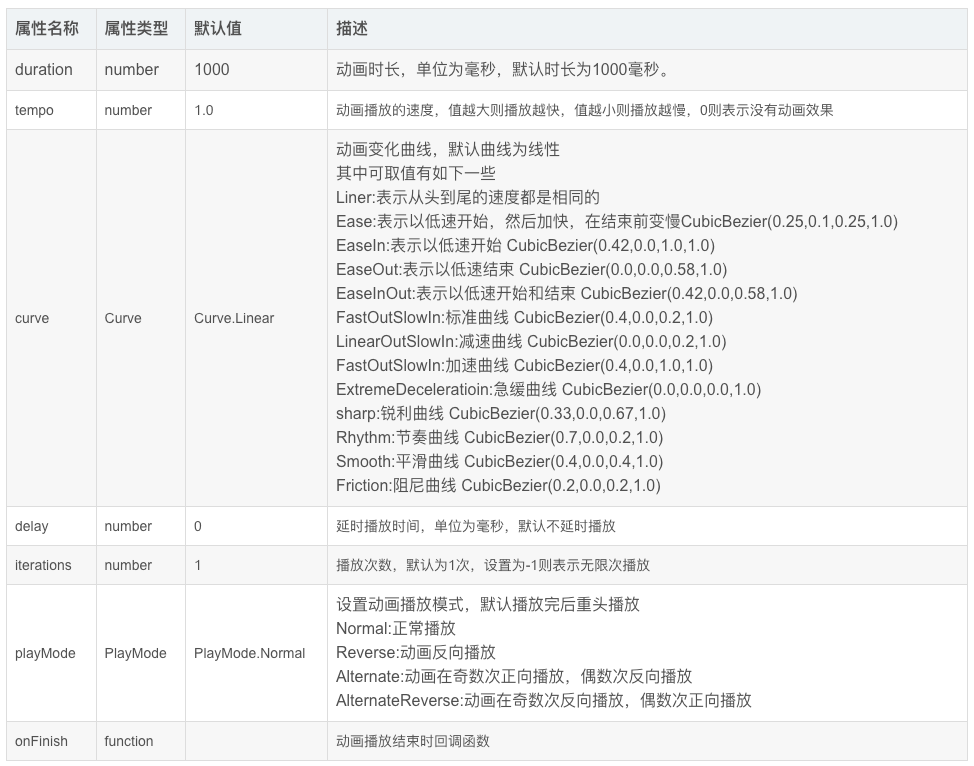
动画的相关参数如下:
2、动画分类
- 从页面分类分为:页面内的动画(在一个页面中即可发生的动画)、页面间的动画(两个页面跳转时会产生的动画)
- 按基础能力可分为:属性动画、显示动画、转场动画
3、页面内动画
3.1、布局更新动画
显示动画(animateTo)和属性动画(animation)是ArkUI提供的最基础和常用的动画功能。
在布局属性(如:尺寸、位置等属性)发生变化时,可以通过属性动画或显示动画,按动画参数过渡到新的布局参数状态。
| 动画类型 | 特点 |
| 显示动画(函数) | 闭包内的变化均会触发动画,包含币数据变化引起的组件增删 |
| 属性动画(属性方法) | 属性变化自动触发动画。(注意:属性值的变化需要加在animation属性之前) |
3.1.1、使用显示动画产生布局更新动画
显示动画的接口:
animateTo(value:AnimateParam, event: () => void): void
第一个参数:指定动画参数
第二个参数:动画的闭包函数
3.1.2、相关实例
@Entry@Componentstruct LayoutChangeTest {@State itemAlign: HorizontalAlign = HorizontalAlign.Start;aligns: HorizontalAlign[] = [HorizontalAlign.Start, HorizontalAlign.Center, HorizontalAlign.End];alignIndex: number = 0;build() {Column({space: 30}) {Text('修改布局位置').fontSize(30).margin({top: 100})Column({space: 25}) {Text("JavaScript").fontSize(20).fontWeight(FontWeight.Bolder).fontColor('#4e72b8')Text("TypeScript").fontSize(20).fontWeight(FontWeight.Bolder).fontColor('#6d8346')Text("ArkTS").fontSize(20).fontWeight(FontWeight.Bolder).fontColor('#69541b')}.margin(20).alignItems(this.itemAlign).justifyContent(FlexAlign.Center).borderWidth(2).width('90%').height(200)Button('Click', {type: ButtonType.Capsule, stateEffect: true}).fontSize(18).fontWeight(FontWeight.Bold).width('50%').onClick(() => {// 显示动画animateTo({duration: 1000, curve: Curve.EaseInOut},() => {// 在闭包函数中修改上方元素的对齐方式this.alignIndex = (this.alignIndex + 1) % this.aligns.length;this.itemAlign = this.aligns[this.alignIndex];})})}.width('100%').height('100%')}}
@Entry@Componentstruct LayoutChangeTest1 {@State mySize: number = 30;// 标志位,用来控制组件的大小@State flag: boolean = false;build() {Column( {space: 20} ) {Text('HarmonyOS').fontColor('#ed1941').fontWeight(FontWeight.Bolder).fontSize(this.mySize).margin(10)Button(this.flag ? '缩小': '放大', {type:ButtonType.Capsule,stateEffect:true}).width('50%').fontSize(16).onClick(() => {animateTo({duration: 1000, curve: Curve.Ease}, () => {if(this.flag) {this.mySize = 30;} else {this.mySize = 50;}this.flag = !this.flag;});})}.justifyContent(FlexAlign.Center).width('100%').height('100%')}}
@Entry@Componentstruct LayoutPage2 {@State message: string = '改变角度';@State rotateAngle: number = 0;@State flag: boolean = false;build() {Row() {Column({space:15}) {Text(this.message).fontSize(50).fontWeight(FontWeight.Bold)Image($r('app.media.image2')).width(200).height(200).borderRadius(100).rotate({x: 1,y: 1,z: 1,angle: this.rotateAngle}).onClick(() => {animateTo({},() => {if(this.flag) {this.rotateAngle = 0;} else {this.rotateAngle = 640;}this.flag = !this.flag;})})}.width('100%')}.height('100%')}}
3.1.3、使用属性动画产生布局更新动画
显示动画是把要执行动画的属性修改放在闭包函烽中触发动画,而属性动画则不需要使用闭包,只需要把animation属性加在要做属性动画的组件的属性后就可以了。
属性动画接口
animation(value: AnimateParam)
参数value表示动画参数。
注意:如果希望某个属性值的变化而产生动画,则需要此属性需要加到animation属性之前。
3.1.4、相关案例
@Entry@Componentstruct AttrAnimationTest1 {@State widthSize: number = 250;@State heightSize: number = 100;@State rotateAngle: number = 0;@State flag: boolean = true;build() {Row() {Column() {Button('change size').onClick(() => {if(this.flag) {this.widthSize = 150;this.heightSize = 50;} else {this.widthSize = 250;this.heightSize = 100;}this.flag = !this.flag;}).margin(30).width(this.widthSize).animation({duration:2000,iterations:3,curve: Curve.Linear,playMode: PlayMode.Alternate}).height(this.heightSize).animation({duration:1000,curve: Curve.Linear,playMode:PlayMode.Alternate})Button('change rotate angle').onClick(() => {this.rotateAngle = 90;}).margin(50).rotate({angle: this.rotateAngle}).animation({duration:1000,iterations:-1,curve:Curve.Linear,playMode:PlayMode.Alternate})}.width('100%')}.height('100%')}}
4、组件内转场动画
组件内转场动画使用transition,它常见的用法如下:
1、if/else产生组件内转场动画
2、ForEach产生组件内转场动画
组件的插入、删除过程即为组件本身的转场过程,通过设置转场动画,可以定义组件出现、消失的效果。
组件内转场动画的接口:
transition(value: TransitionOptions)
transition函数的入参为组件内转场的效果,可以定义平移、透明度、旋转、缩放这几种转场样式的单个或者组件的转场效果,必须和animateTo一起使用才能产生组件转场效果。
transition常见用法
1、组件的插入、删除使用同一个动画效果
Button().transition({type: TransitionType.All, scale: {x: 0, y: 0 }})
当type属性为TransitionType.All时,表示指定转场动效生效在组件的所有变化(插入和删除)场景,这个时候删除动画和插入动画是相反的过程。
2、组件的插入、删除使用不同的动画效果
Button().transition({type: TransitionType.Insert, translate: {x: 200, y: -200}, opacity: 0}).transition({type: TransitionType.Delete, rotate: {x: 0, y:0, z:1, angle:360}})
3、只定义组件的插入或删除其中一种动画效果
Button().transition({type: TransitionType.Delete, translate:{x: 200,y: -200}})
4.1、if/else产生组件内转场动画
@Entry@Componentstruct TransitionTest {@State flag: boolean = true;build() {Row() {Column() {Button(this.flag ? '隐藏' : '显示').fontSize(20).margin(30).width(150).height(50).onClick(() => {// 在animateTo闭包中改变flag的值animateTo({duration:1500},() => {// 点击按钮来控制标记变量this.flag = !this.flag;})})if(this.flag) {Text('HarmonyOS').fontSize(20).fontWeight(FontWeight.Bolder).fontColor('#008792')// 添加转场效果.transition({type: TransitionType.Insert, translate: {x: 200, y: -200}}).transition({type: TransitionType.Delete, opacity: 0, scale: {x: 0, y: 0}})}}.width('100%')}.height('100%')}}
4.2、ForEach产生组件内转场动画
ForEach可通过控制数组中的元素个数,来控制组件的插入和删除。通过ForEach来产生组件内转场动画,需要两个条件
1、ForEach里的组件配置了transition效果
2、在animateTo的闭包中控制组件的插入或删除,即控制数组的元素添加和删除
@Entry@Componentstruct ForEachTest {@State books :string[] = ['《JavaScript学习指南》','《TypeScript从入门到精通》','《ArkTS学习手册》','《JAVA核心卷》'];num: number = 0;build() {Column({space: 10}) {Column(){// 注意 这里遍历的key是使用item,所以我们在添加时加上一个num来区分内容ForEach(this.books, (item) => {Text(item).textStyle().transition({type: TransitionType.All, translate: {x: 200},scale:{x:0,y:0}})},item => JSON.stringify(item))}.columnStyle()Button('头部添加元素').ButtonStyle('#375830', () => {animateTo({}, () => {this.num++;this.books.unshift(`《C语言编程思想》_${this.num}`)})})Button('头部删除元素').ButtonStyle('#b64533', () => {animateTo({}, () => {this.books.shift()})})Button('尾部删除元素').ButtonStyle('#dea32c', () => {animateTo({}, () => {this.books.pop()})})}.width('100%').height('100%')}}// 相关样式信息@Extend(Text) function textStyle() {.width(300).height(60).fontSize(18).margin({top: 3}).backgroundColor('#d3c6a6').textAlign(TextAlign.Start).fontColor(Color.White)}@Extend(Column) function columnStyle() {.margin(10).justifyContent(FlexAlign.Start).alignItems(HorizontalAlign.Center).width('90%').height('50%')}@Extend(Button) function ButtonStyle(color: string|Color, click: Function) {.width(200).height(50).fontSize(18).backgroundColor(color).onClick(() => {// click代表的就是调用时具体传入进来的函数click()})}
5、页面间的动画
5.1、共享元素转场动画
在不同的页面间,有使用相同元素的场景,可以使用共享元素转场动画衔接。
共享元素转场的接口:
sharedTransition(id: string, options?: sharedTransitionOptions)
其中id为指定共享元素的组件id
根据sharedTransitionOptions中的type参数,可以把共享元素转场分为Exchange类型和Static类型。
5.1.1、Exchange类型
交换型共享元素转场。
这种类共享元素转场适用于两个页面间相同元素的衔接,从起始页共享元素的位置、大小过渡到目标页面的共享元素的位置、大小。
当不指定type时,默认就是Exchange类型的共享转场
使用Exchange类型的共享转场时,共享元素转场的动画参数由目标页面options中的动画参数决定。
5.1.2、Static类型的共享元素转场
静态类型的共享元素转场常用于页面跳转时,标题的渐入淡出,只需要在一个页面中有Static的共享元素,不能在两个页面中出现相同id的Static类型的共享元素。
// Src.etsimport router from '@ohos.router';@Entry@Componentstruct Src {build() {Column({ space: 30 }) {// Exchange类型共享转场Image($r('app.media.image2')).width(50).height(50).opacity(.3).borderRadius(75).sharedTransition('img1',{duration: 1000,curve: Curve.Linear})}.onClick(() => {// 路由跳转router.pushUrl({url: "pages/SharedTransition/Dest"});}).padding(10).width('100%').height('100%').alignItems(HorizontalAlign.Start)}}
// Dest.etsimport router from '@ohos.router';@Entry@Componentstruct Dest {build() {Column({ space: 30 }) {// 配置Static类型的共享元素转场Text('鸿蒙系统').fontSize(20).fontColor('#6d8346').opacity(.8).fontWeight(FontWeight.Bold).margin({ top: 10 }).sharedTransition('text',{duration: 500,curve: Curve.Linear,type: SharedTransitionEffectType.Static})// 配置Exchange类型的共享元素转场,id是'img1'Image($r('app.media.image2')).width(150).height(150).opacity(1).borderRadius(75).sharedTransition('img1',{duration: 500,curve: Curve.Linear})}.width('100%').height('100%').alignItems(HorizontalAlign.Center).onClick(() => {// 返回router.back();})}}
5.2、页面转场动画
两个页面之间发生跳转,一个页面消失,另一个页面出现,此时可以配置各自页面的页面转场参数实现自定义的页面转场效果。
页面转场效果写在pageTransition函数中,通过PageTransitionEnter和PageTransitionExit来指定页面进入和退出时的动画效果。
pageTransitionEnter接口
PageTransitionEnter({type?: RouteType, duration?: number, curve?: Curve | string, delay: number})
pageTransitionEnter提供了onEnter接口进行自定义页面入场动画的回调
pageTransitionExit接口
PageTransitionExit({type?: RouteType, duration?: number, curve?: Curve | string, delay: number})
pageTransitionExit提供了onExit接口进行自定义页面退场动画的回调
关于RouteType表示路由生效类型,从一个页面到另一个页面有两人种方式,一种是push,一种是back(pop出栈),那么type参数就可以由开发者指定哪种类型的路由来定义转场效果。对于push和back会有一些区别,比如A页面到B页面push时,A页面是退场,B页面是入场,如果B页面back回A页面则是B页面退场,A页面入场。
type参数的默认值是RouteType.None表示对页面的push和pop都生效
如果我们把页面转场时长设置为0(duration参数值为0)则无页面转场动画。
// Src2.estimport router from '@ohos.router';@Entry@Componentstruct Src2 {@State scale1: number = 1;@State opacity1: number = 1;build() {Column({ space: 30}) {Text('Src2...').fontSize(30).opacity(this.opacity1).margin({bottom: 15})Image($r('app.media.image2')).width(300).height(400).scale({x: this.scale1}).opacity(this.opacity1)}.width('100%').height('100%').onClick(() => {router.pushUrl({url: "pages/pageTransition/Dest2"})})}pageTransition() {PageTransitionEnter({}).onEnter((type: RouteType, progress: number) => {this.scale1 = 1;this.opacity1 = progress;})PageTransitionExit({}).onExit((type: RouteType, progress: number) => {this.scale1 = 1 - progress;;this.opacity1 = 1 - progress;})}}
// Dest2.estimport router from '@ohos.router';@Entry@Componentstruct Dest2 {@State scale1: number = 1;@State opacity1: number = 1;build() {Column(){Text('Dest2...').fontSize(30).opacity(this.opacity1).margin({bottom: 15})Image($r('app.media.image2')).width(300).height(400).scale({y: this.scale1}).opacity(this.opacity1)}.width('100%').height('100%').onClick(() => {router.back()})}pageTransition() {PageTransitionEnter({}).onEnter((type: RouteType, progress: number) => {this.scale1 = progress;this.opacity1 = progress;})PageTransitionExit({}).onExit((type: RouteType, progress: number) => {this.scale1 = 1 - progress;this.opacity1 = 1 - progress;})}}
6、网络
6.1、基于web组件构建网络应用
当需要访问网络资源的时候需要在module.json5中申请网络访问权限:ohos.permission.INTERNET
Web组件的使用只需要ArkTS文件中创建一个Web组件,传入两个参数就可以了。
src:指定了网页的路径
controller:组件控制器,绑定web组件,实现对web组件的控制
import webview from '@ohos.web.webview';@Entry@Componentstruct WebComp {controller: WebviewController = new webview.WebviewController();build() {Row() {Column() {Web({src: 'https://www.baidu.com',controller: this.controller})}.width('100%')}.height('100%')}}
6.1.1、本地网页加载
首先本的网页文件可以放在rawfile目录中
<!-- index.html --><!doctype html><html lang="en"><head><meta charset="UTF-8"><meta name="viewport"content="width=device-width, user-scalable=no, initial-scale=1.0, maximum-scale=1.0, minimum-scale=1.0"><meta http-equiv="X-UA-Compatible" content="ie=edge"><title>Document</title></head><body><div><h2>加载本地网页</h2></div><div><img src="../base/media/img1.png" width="300" height="400"></div></body></html>
在ets文件中对这个页面进行加载展示
import webview from '@ohos.web.webview'@Entry@Componentstruct WebComp2 {controller: WebviewController = new webview.WebviewController();build() {Row() {Column() {Web({src: $rawfile('index.html'),controller: this.controller})}.width('100%')}.height('100%')}}
6.1.2、网页缩放能力
有时网页可能不能与手机屏幕很好地适配,需要对其缩放才能有更好的效果,这个时候可以给Web组件zoomAccess属性,它用来设置是否支持手势 进行缩放,默认是行缩放的。
Web({ src:'www.example.com', controller:this.controller }).zoomAccess(true)
还可以使用zoom(factor: number)方法用于设置网站的缩放比例,参数factor表示缩放的倍数
import webview from '@ohos.web.webview';@Entry@Componentstruct WebComp {controller: WebviewController = new webview.WebviewController();build() {Row() {Column() {Button('zoom+').width('50%').onClick(() => {this.controller.zoom(1.5)})Web({src: 'https://www.baidu.com',controller: this.controller})}.width('100%')}.height('100%')}}
上面示例每次点击zoom+时会把页面放大为原来的1.5倍。
6.1.3、文本缩放
如果需要对文本进行缩放,可以使用textZoomAtio(textZoomAtio: number)方法
textZoomRatio为缩放的百分比,默认值是100,表示100%
import webview from '@ohos.web.webview';@Entry@Componentstruct WebComp {@State textZoom: number = 100;controller: WebviewController = new webview.WebviewController();build() {Row() {Column() {Button('文大文本+').width('50%').onClick(() => {this.textZoom += 20;})Web({src: 'https://www.baidu.com',controller: this.controller}).textZoomRatio(this.textZoom)}.width('100%')}.height('100%')}}
6.1.4、web组件事件
web组件还提供了处理JavaScript的对话框、网页加载进度及各种通知与请求事件的方法。
onProgressChange 监听网页的加载进度
onPageEnd 在网页加载完时触发此回调
onConfirm 在网页触发confirm告警弹窗时触发回调
<!-- index.html --><!doctype html><html lang="en"><head><meta charset="UTF-8"><meta name="viewport"content="width=device-width, user-scalable=no, initial-scale=1.0, maximum-scale=1.0, minimum-scale=1.0"><meta http-equiv="X-UA-Compatible" content="ie=edge"><title>Document</title></head><body><div><h2>加载本地网页</h2></div><div><img src="../base/media/img1.png" width="300" height="400"></div><script type="text/javascript">confirm('confirm message from html')</script></body></html>
import webview from '@ohos.web.webview'@Entry@Componentstruct WebComp2 {controller: WebviewController = new webview.WebviewController();build() {Row() {Column() {Web({src: $rawfile('index.html'),controller: this.controller}).zoomAccess(true).onConfirm((event) =>{AlertDialog.show({title: 'title',message: event.message,confirm: {value: 'onAlert',action: () => {event.result.handleConfirm();}},cancel: () => {event.result.handleCancel();}})return true;})}.width('100%')}.height('100%')}}
6.1.5、web与javascript的交互
web组件可以调用JavaScript方法,JavaScript也可以调用Web组件里的方法
web组件启用javascript
如果在web组件中运行javascript,则必须要在web组件中启用javascript功能,默认情况下是不可以执行javascript的。
Web({src: 'https://www.example.com', controller: this.controller}).javaScriptAccess(true)
web组件调用JS方法
比如在web组件onPageEnd事件中添加runJavaScript方法,这个事件是在网页加载完成时的回调,runJavaScript方法可以执行HTML中的JavaScript脚本
<!-- index.html --><!doctype html><html lang="en"><head><meta charset="UTF-8"><meta name="viewport"content="width=device-width, user-scalable=no, initial-scale=1.0, maximum-scale=1.0, minimum-scale=1.0"><meta http-equiv="X-UA-Compatible" content="ie=edge"><title>Document</title></head><body><div><h2>加载本地网页</h2></div><div><img src="../base/media/img1.png" width="300" height="400"></div><script type="text/javascript">function test() {return "this value is from index.html"}</script></body></html>
import webview from '@ohos.web.webview'@Entry@Componentstruct WebComp2 {controller: WebviewController = new webview.WebviewController();@State webResult: string = ''build() {Row() {Column() {Text(this.webResult).fontSize(16)Web({src: $rawfile('index.html'),controller: this.controller}).zoomAccess(true).javaScriptAccess(true).onPageEnd(e => {this.controller.runJavaScript('test()',(err,data)=>{if(!err) {this.webResult = data;}})// promise化的写法// let promise = this.controller.runJavaScript('test()');// promise.then((data) => {// this.webResult = data;// })})}.width('100%')}.height('100%')}}
js调用web组件方法
开发者者使用Web组件把应用侧代码注册到前端页面中,注册完成之后,前端页面中使用注册的对象名称就可以调用应用侧的函数,从而实现前端页面中调用应用侧的方法。
注册应用侧代码有两种方式:
一种是Web组件初始化使用调用,使用javaScriptProxy()接口。
一种是在Web组件初始化完成后调用,使用registerJavaScriptProxy()接口
javaScriptProxy()接口使用示例:
// xxx.etsimport web_webview from '@ohos.web.webview';@Entry@Componentstruct WebComponent {webviewController: web_webview.WebviewController = new web_webview.WebviewController();// 声明需要注册的对象testObj = {test: () => {return 'ArkTS Hello World!';}}build() {Column() {// web组件加载本地index.html页面Web({ src: $rawfile('index.html'), controller: this.webviewController})// 将对象注入到web端.javaScriptProxy({object: this.testObj,name: "testObjName",methodList: ["test"],controller: this.webviewController})}}}
应用侧使用registerJavaScriptProxy()接口注册
// xxx.etsimport web_webview from '@ohos.web.webview';@Entry@Componentstruct Index {webviewController: web_webview.WebviewController = new web_webview.WebviewController();testObj = {test: (data) => {return "ArkUI Web Component";},toString: () => {console.info('Web Component toString');}}build() {Column() {Button('refresh').onClick(() => {try {this.webviewController.refresh();} catch (error) {console.error(`Errorcode: ${error.code}, Message: ${error.message}`);}})Button('Register JavaScript To Window').onClick(() => {try {this.webviewController.registerJavaScriptProxy(this.testObj, "testObjName", ["test", "toString"]);} catch (error) {console.error(`Errorcode: ${error.code}, Message: ${error.message}`);}})Web({ src: $rawfile('index.html'), controller: this.webviewController })}}}
注意: 使用registerJavaScriptProxy()接口注册方法时,注册后需调用refresh()接口生效
<!-- index.html --><!DOCTYPE html><html><body><button type="button" onclick="callArkTS()">Click Me!</button><p id="demo"></p><script>function callArkTS() {let str = objName.test();document.getElementById("demo").innerHTML = str;console.info('ArkTS Hello World! :' + str);}</script></body></html>
6.1.6、页面导航处理
当使用浏览器浏览网页时,可以执行返回、前进、刷新等操作,Web组件也支持这些操作。可以使用backward()回到上一个页面,forward()前进一个页面,refresh()刷新页面,clearHistory()清除历史记录。
import webview from '@ohos.web.webview'@Entry@Componentstruct NavigatorTest {controller: WebviewController = new webview.WebviewController();build() {Row() {Column() {Row() {Button('前进').onClick(() => {this.controller.forward();})Button('后退').onClick(() => {this.controller.backward();})Button('刷新').onClick(() => {this.controller.refresh();})Button('停止').onClick(() => {this.controller.stop();})Button('清理历史').onClick(() => {this.controller.stop();})}.padding(5).backgroundColor(Color.Gray).width('100%').justifyContent(FlexAlign.SpaceAround)Web({src: 'https://www.baidu.com', controller: this.controller})}.width('100%')}.height('100%')}}
6.2、HTTP数据请求
6.2.1、简单说明
开发的应用需要通过HTTP发送一个数据请求,支持的情求方式有:GET、POST、OPTIONS、HEAD、PUT、DELETE、TRACE、CONNECT
HTTP数据请求功能主要由http模块提供,这个功能也需要申请ohos.permission.INTERNET权限
相关的方法说明:
| 方法名称 | 功能描述 |
| createHttp() | 创建一个http请求 |
| request() | 根据URL地址,发起HTTP网络请求 |
| destroy() | 中断请求任务 |
| on(type: 'headerReceive') | 订阅HTTP Response Header 事件 |
| off(type: 'headerReceive') | 取消订阅HTTP Response Header事件 |
6.2.2、开发步骤
1、导入http模块
import http from '@ohos.net.http';
2、创建HTTP请求实例,生成HttpRequest对象
let httpRequest = http.createHttp();
注意:每一个httpRequest对应一个http请求任务,不可以复用
3、订阅HTTP响应头(可选)
4、根据URL地址,发起HTTP网络请求
5、处理HTTP响应头和HTTP网络请求的返回结果(可选)
// 导入模块import http from '@ohos.net.http';@Entry@Componentstruct HttpTest {url: string = 'https://mock.apifox.com/m1/3690335-0-default/getHot'@State titles: string[] = [];build() {Row() {Column() {Button('获取数据').width('50%').margin({bottom: 15}).onClick(() => {// 创建请求对象let httpReq = http.createHttp();// 发起请求httpReq.request(this.url,{method: http.RequestMethod.GET,}, (err,data) => {// 处理结果if(!err) {// this.titles = JSON.parse(`${data}`).values['title']let arr = JSON.parse(`${data.result}`).valuesfor(let item of arr) {this.titles.push(item['title']);}}})})ForEach(this.titles, (item) =>{Text(item).fontSize(14).margin({bottom:5})},item => item)}.width('100%')}.height('100%')}}
6.2.3、http请求-Promise方式
使用这种方式是为了避免地狱回调的问题。
// 导入模块import http from '@ohos.net.http';@Entry@Componentstruct HttpPromiseTest {url: string = 'https://mock.apifox.com/m1/3690335-0-default/getHot'@State titles: string[] = [];build() {Row() {Column() {Button('获取数据').width('50%').margin({bottom: 15}).onClick(() => {// 创建http请求let httpReq = http.createHttp();// 发起请求let promise = httpReq.request(this.url)promise.then((data) => {let arr = JSON.parse(`${data.result}`).valuesfor(let item of arr) {this.titles.push(item['title']);}})})ForEach(this.titles, (item) =>{Text(item).fontSize(14).margin({bottom:5})},item => item)}.width('100%')}.height('100%')}}